Working with Stream Content
Learn how to setup a grid to stream content from a social media service provider.

Table of Contents
Using Content from Social Media
Essential Grid allows you to create completely automated grids that showcase content you’ve posted on any one of seven provider sites: YouTube, Vimeo, Instagram, Flickr, Facebook, Twitter and Behance.
You can do this using the Stream grid source type.
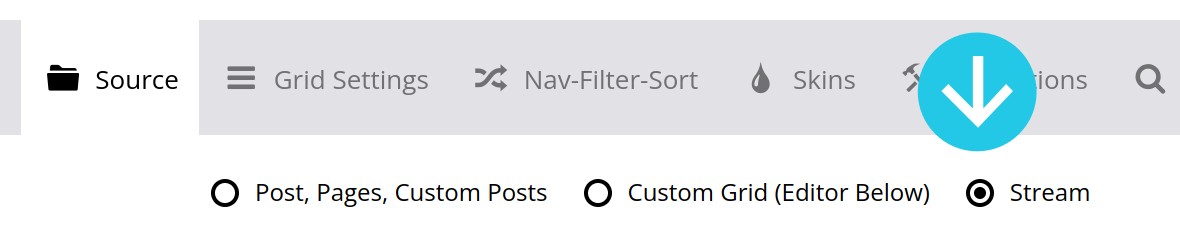
To begin, go to the Source panel and set the Based on option to Stream:
Configuring Provider Details
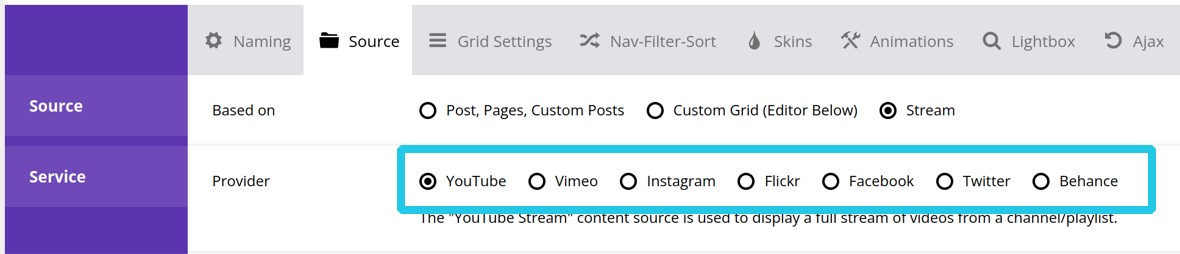
After activating the Stream source type, the next step is to select the service provider from which you want your content to be drawn. To do this locate the Service panel, and the Provider option. There you’ll see the seven available service providers. Check the radio button for the service provider you wish to use:
From there, all you need to do is provide access details for the service provider you’ve selected. With some providers this is a very quick process, and with others there may be a few more steps to follow.
Let’s see how to configure access for each one.
YouTube
Fetching content from YouTube is done through YouTube’s Data API. In order to access that API, YouTube requires you to use an API key. An API key is a long string of characters that acts similarly to login credentials.
For that reason, to setup a YouTube stream grid you should first obtain an API key, then add that key to your grid settings. Let’s see how that can be done.
Obtain and Add a YouTube API Key
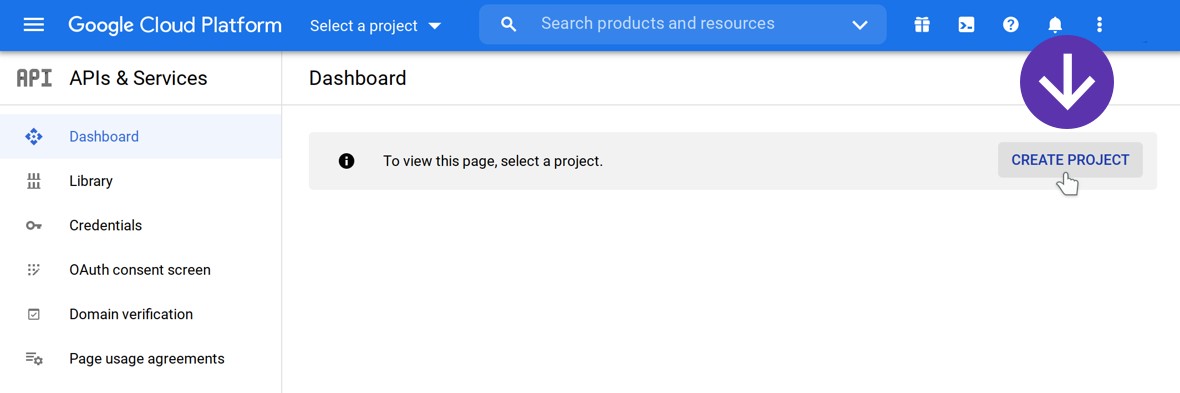
First, login to the Google Account associated with your YouTube channel, then visit the Google Developers Console.
Once in the developer dashboard, click the CREATE PROJECT button:
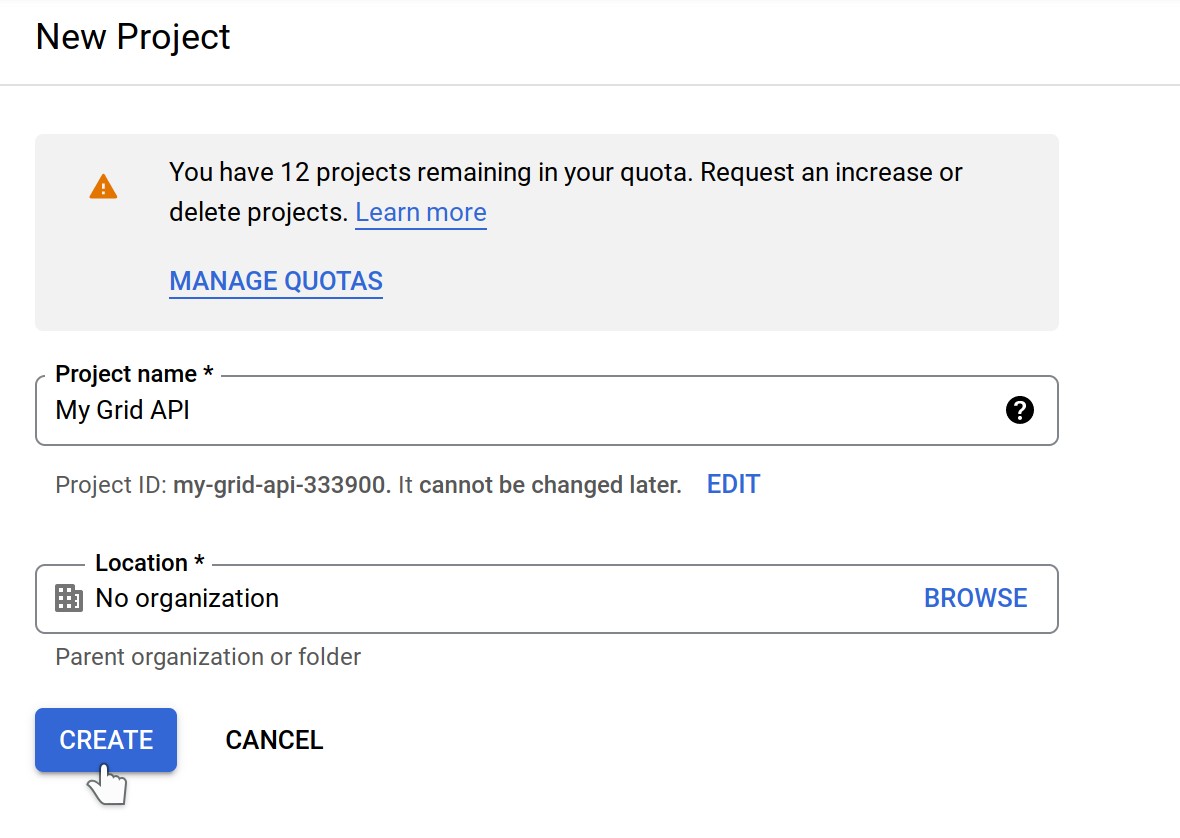
On the next screen, give your project a name then click the CREATE button:
Click the Credentials submenu on the left-hand side:
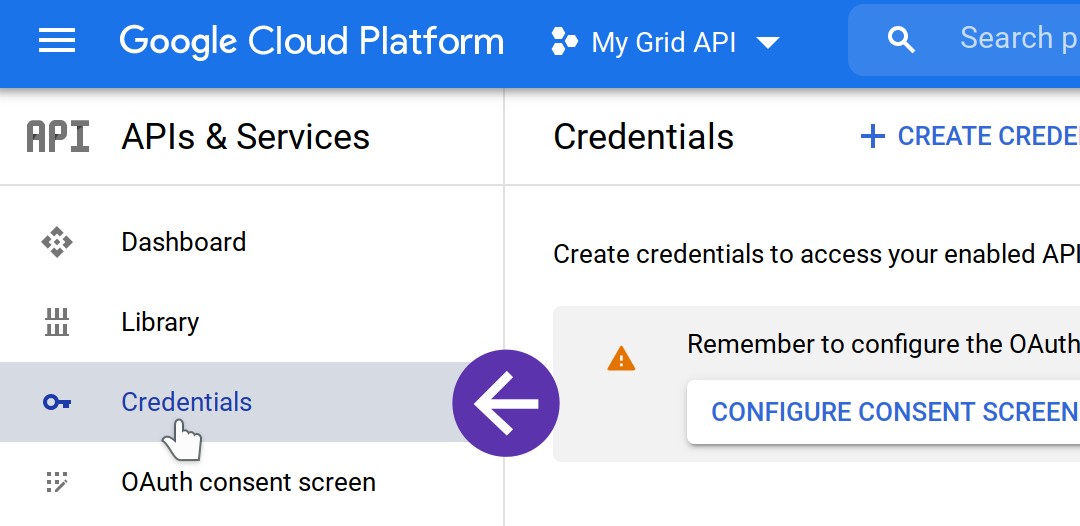
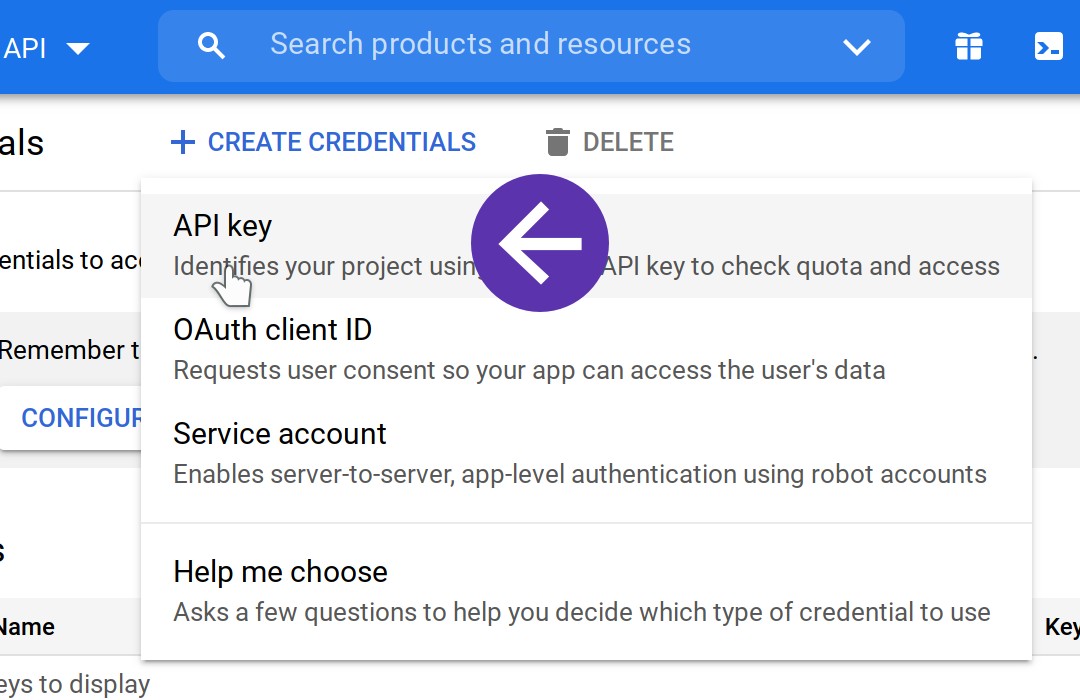
Then on the top bar click the CREATE CREDENTIALS drop down and choose API key:
An API key will be generated and shown to you in a pop up box. Click the Copy button to put the API key into your cache:

Back in the Essential Grid options page for your grid, locate the API panel and the API Key option, then paste in your API key:

Find and Add Your Channel ID
The next step is to find and add your channel ID to your grid settings.
To get to get your channel ID, first to make sure you are logged in to your YouTube account, then go to your Advanced Account Settings page and you will see your channel ID displayed:

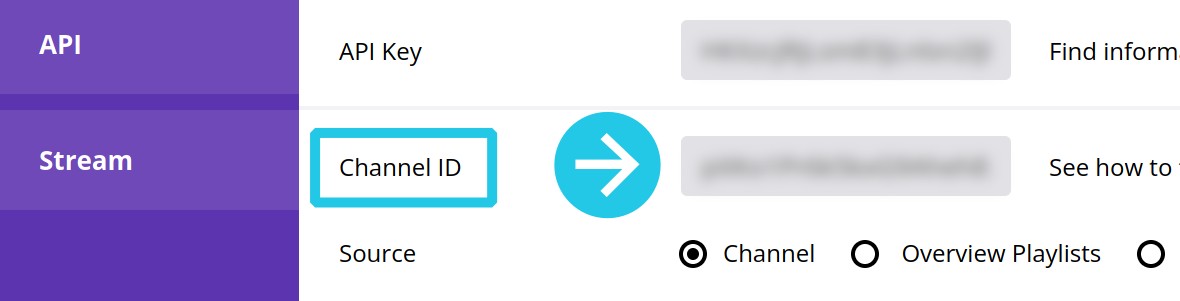
Then in your Essential Grid options, locate the Stream panel and the Channel ID option, then paste in your channel ID:
YouTube Video Source
Once you’ve configured your credentials and connected to YouTube you have three possible video sources to choose from for your grid: Channel, Overview Playlists and Single Playlist.
Make your selection from the Stream panel, Source option:

Choose Channel to show all videos from your channel.
Choose Overview Playlists to show the first video from each of the playlists on your channel.
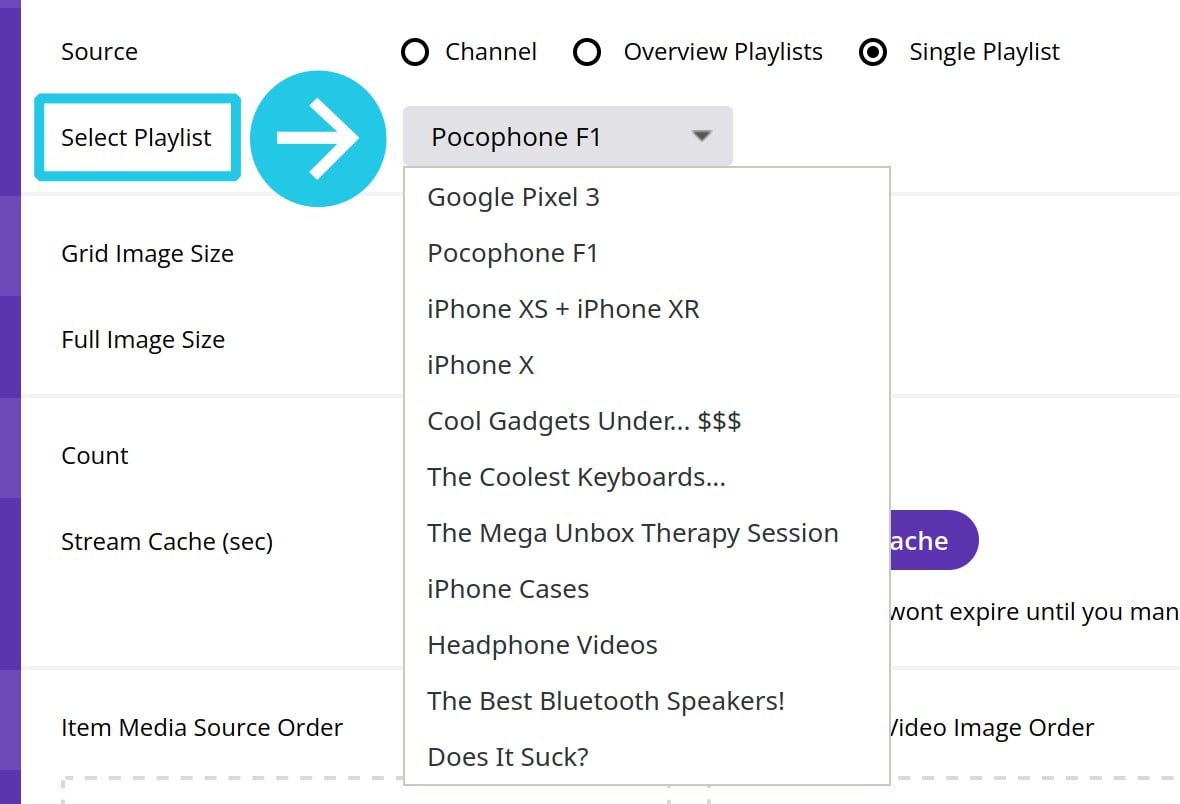
Choose Single Playlist and an additional option will appear below named Select Playlist. This is a dropdown that will show all the playlists on your channel, allowing you to select any one:
Vimeo
Fetching content from Vimeo is more straightforward than YouTube as you don’t need an API key. Rather, you just need the ID of the user, album, group or channel you want to show.
Let’s see how to find each of these.
Find a Vimeo User ID
To find the ID of any Vimeo user go to the related profile page, and in the URL you will see the user ID after vimeo.com/

Find a Vimeo Album / Showcase ID
Albums aka showcases. For this you will need the showcase’s numerical ID. which can be found in the URL of a showcase after /showcase/

Note: A text based ID won’t work, it must be numerical.
Find a Vimeo Group ID
The ID for a group is in its URL after /groups/

Find a Vimeo Channel ID
The ID for a chanel is in its URL after /channel/

Like YouTube, Instagram content is fetched via an API, and requires you to use a key to access that API, in this case referred to as an Access Token.
There are two sources from which you can obtain one of these access tokens: the From Account token source, or the Manual token source.
The From Account token source is by far the easiest one to use, so we recommend you choose it unless you have a specific reason to use the Manual token source.
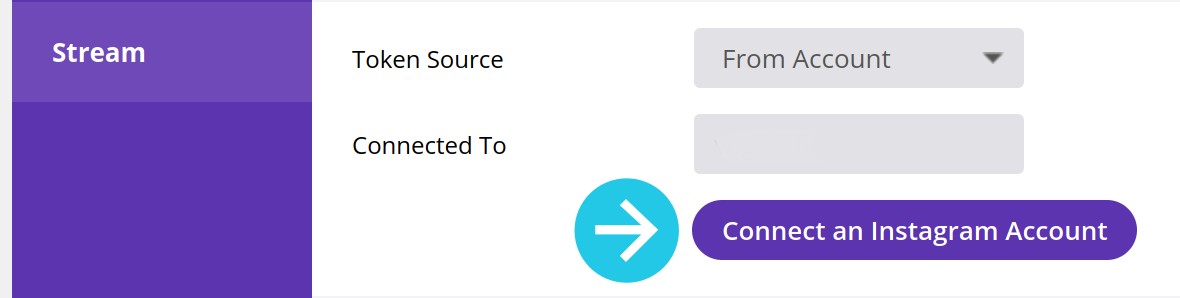
Token From Account
To use the From Account token source look for the Stream panel, then the Token Source option, and from its drop-down list select From Account. Then, below it, click the purple Connect an Instagram Account button:
You’ll then be taken to Instagram and asked to login, if you are not already logged in, then on the next page you’ll be asked to allow permission to access your Instagram account:

After you grant permission you’ll be redirected back to Essential Grid, you’ll see your Instagram username appear in the Connected To field, and content from Instagram should now be fetched and showing in your grid:
Manual Token Source
To use a manually generated token, set the Token Source option to Manual:

There are a few steps involved in generating a token manually, and the full process is a little too in depth to include here, so we invite you to check out our tutorial “Instagram Stream Setup Instructions with Access Token”.
Or, you can refer to Facebook’s official documentation on “Instagram User Access Tokens“.
Flickr
Flickr is another service that works via an api and hence requires an API key. Here’s how you can obtain one and add it to your grid.
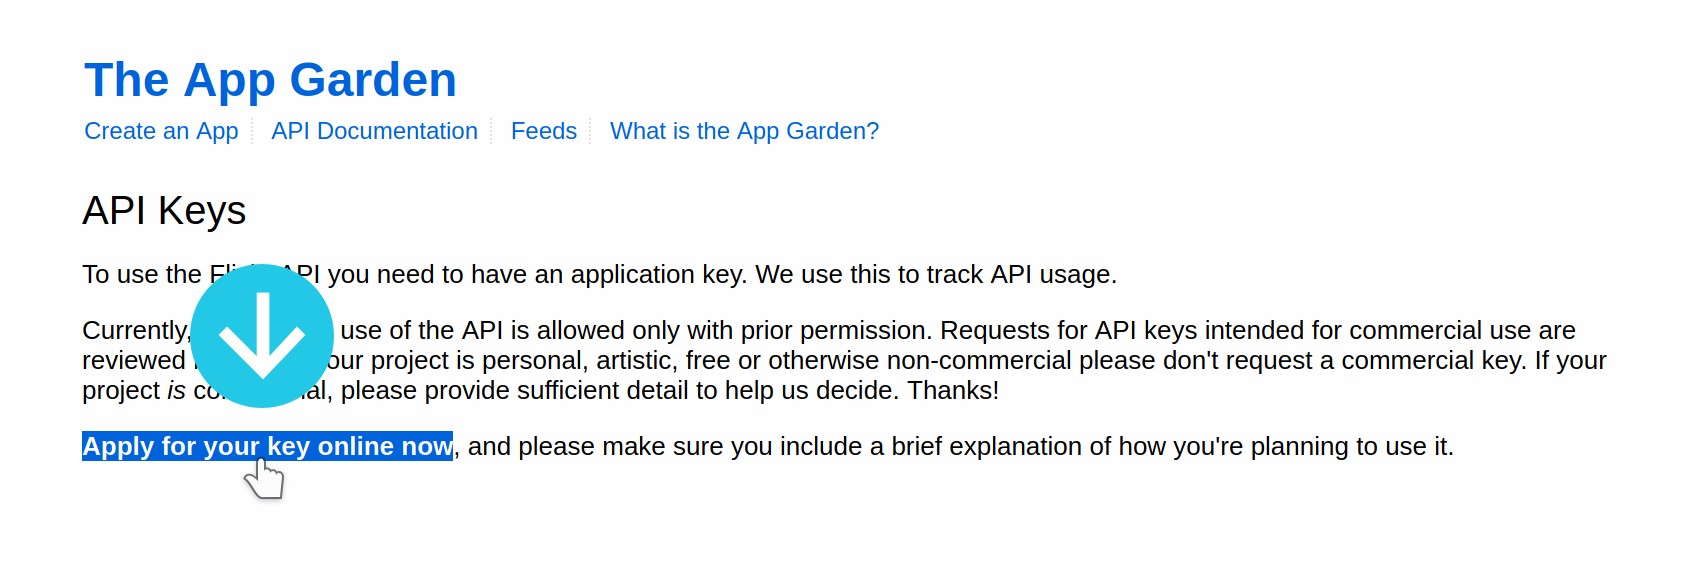
Obtain and Add a Flickr API Key
Login to your Flickr account, go to the App Garden page, then click the Apply for your online key now link:
Next, click the APPLY FOR A NON-COMMERCIAL KEY button:

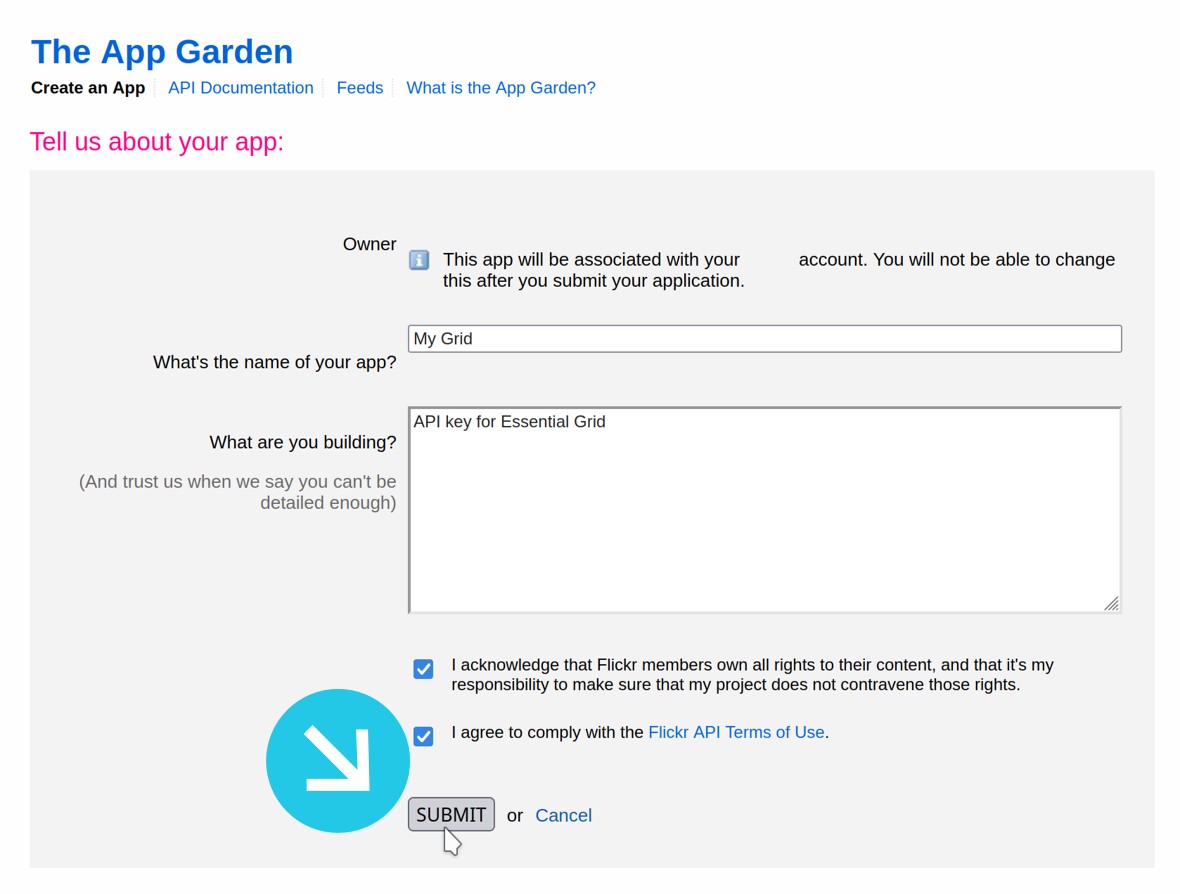
Finally, fill out the form and click SUBMIT:
Your API key will be generated and displayed under the Key label:
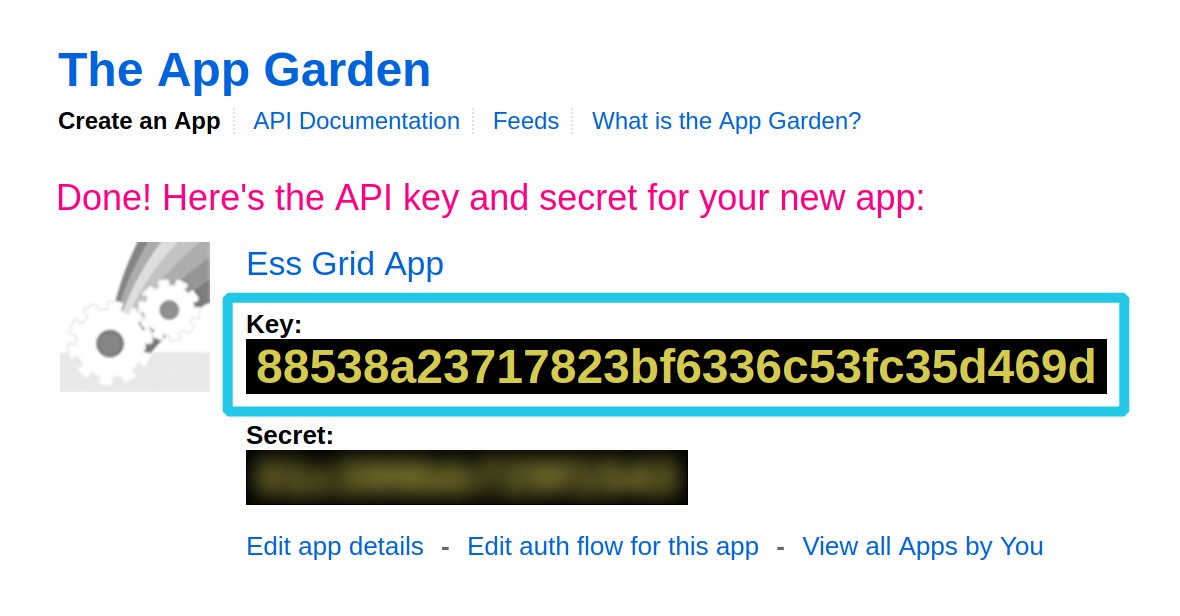
Copy the key and paste it into the Flickr API Key field for your grid:

Flickr Image Source
There are four types of content you can draw from Flickr, and the type you want to use can be directed from the Stream panel, Source option:

Choose User Public Photos and add the URL of any Flickr account to show the photos from that account.
Choose User Album to show the photos from an album in your own Flickr account.
Choose Gallery and add the URL of any Flickr gallery to show the photos from that gallery.
Choose Groups’ Photos and add the URL of any Flickr group to show the photos from that group.
Connecting your grid to Facebook is very similar to Instagram, in that you need an Access Token can obtain ether through the automated From Account method, or through the Manual method.
Again, the automated method is considerably easier so we recommend it in most cases.
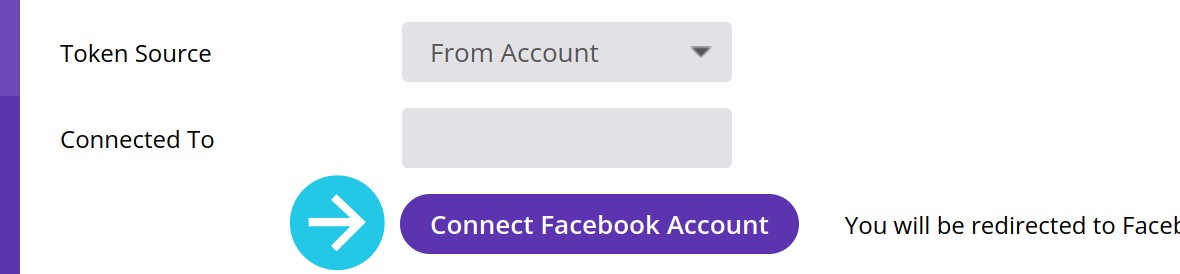
Token From Account
To use the From Account token source look for the Stream panel, then the Token Source option, and from its drop-down list select From Account. Then, below it, click the purple Connect Facebook Account button:
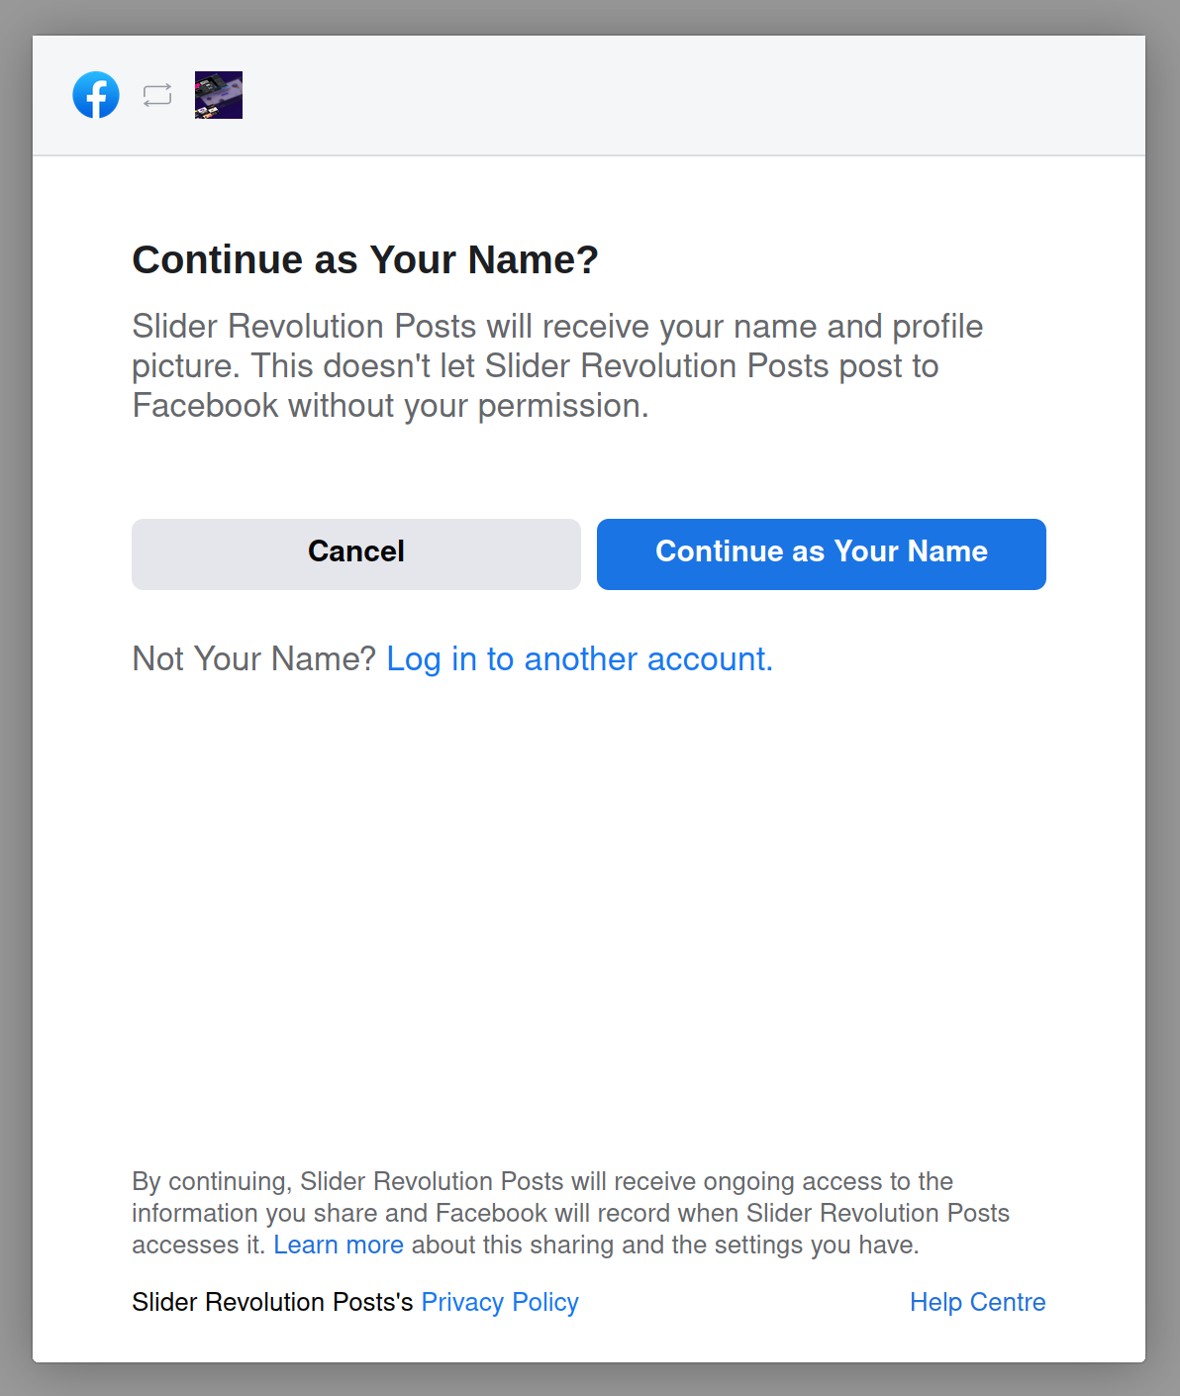
You’ll then be taken to Facebook and asked to login, if you are not already logged in, then on the next page you’ll be asked to continue under whatever name your Facebook account uses:
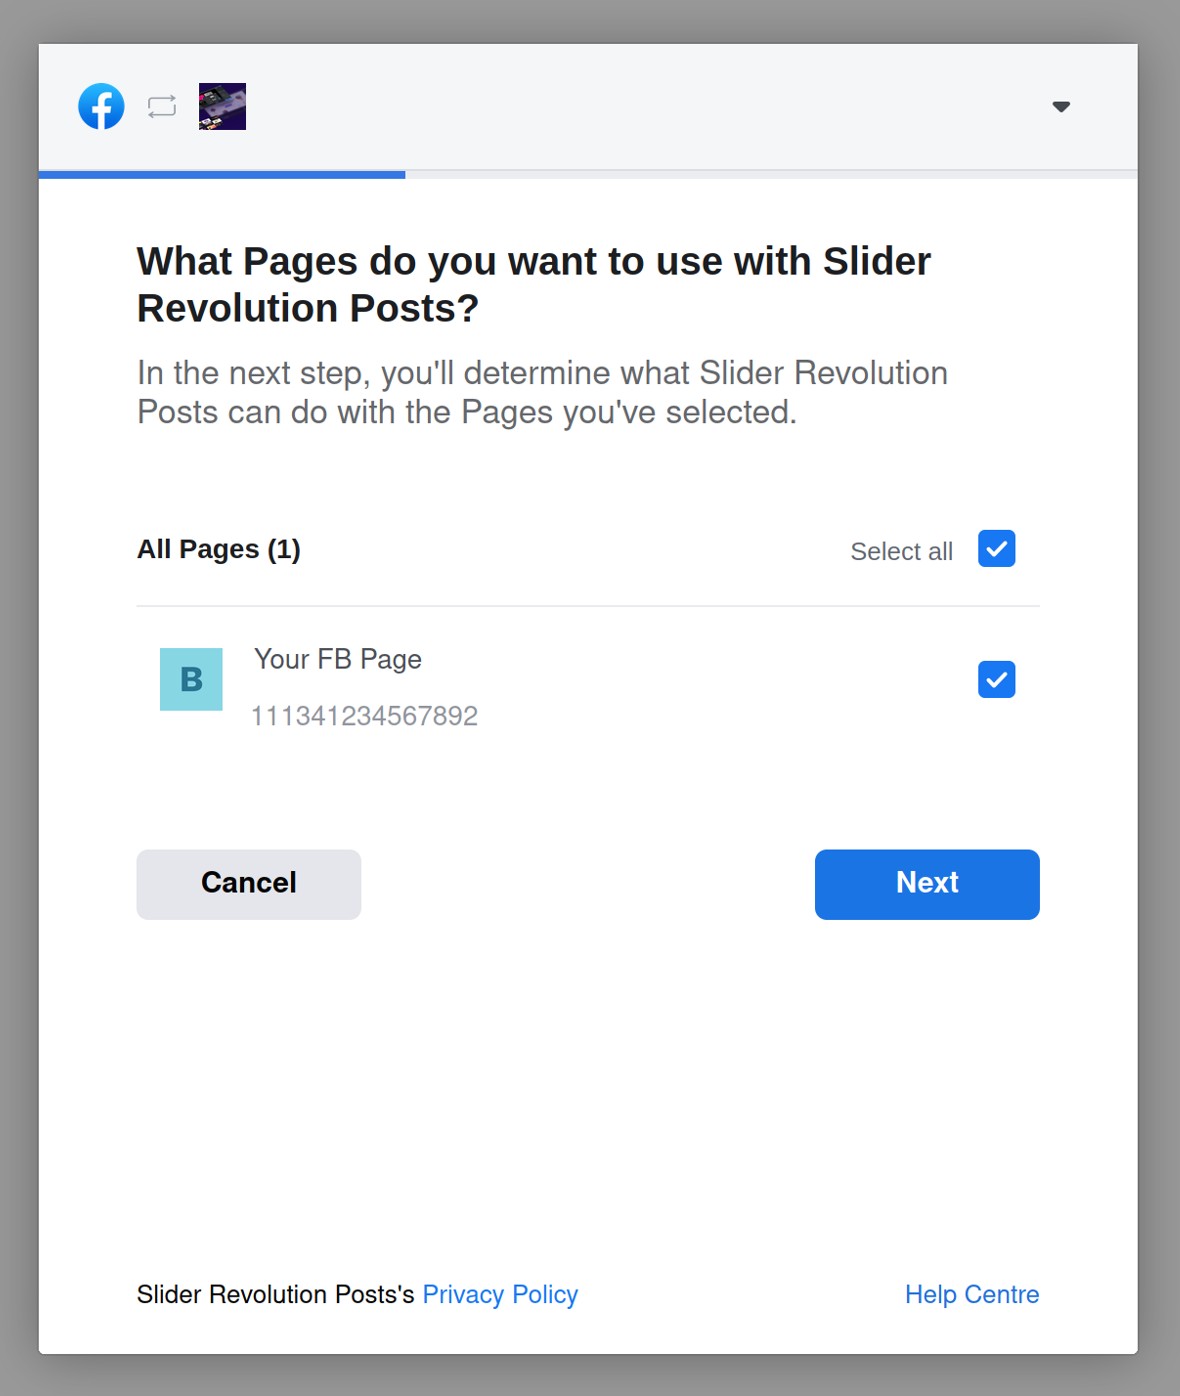
On the next screen, check the box for each Facebook page you’d like to be able to draw content from, then click Next:
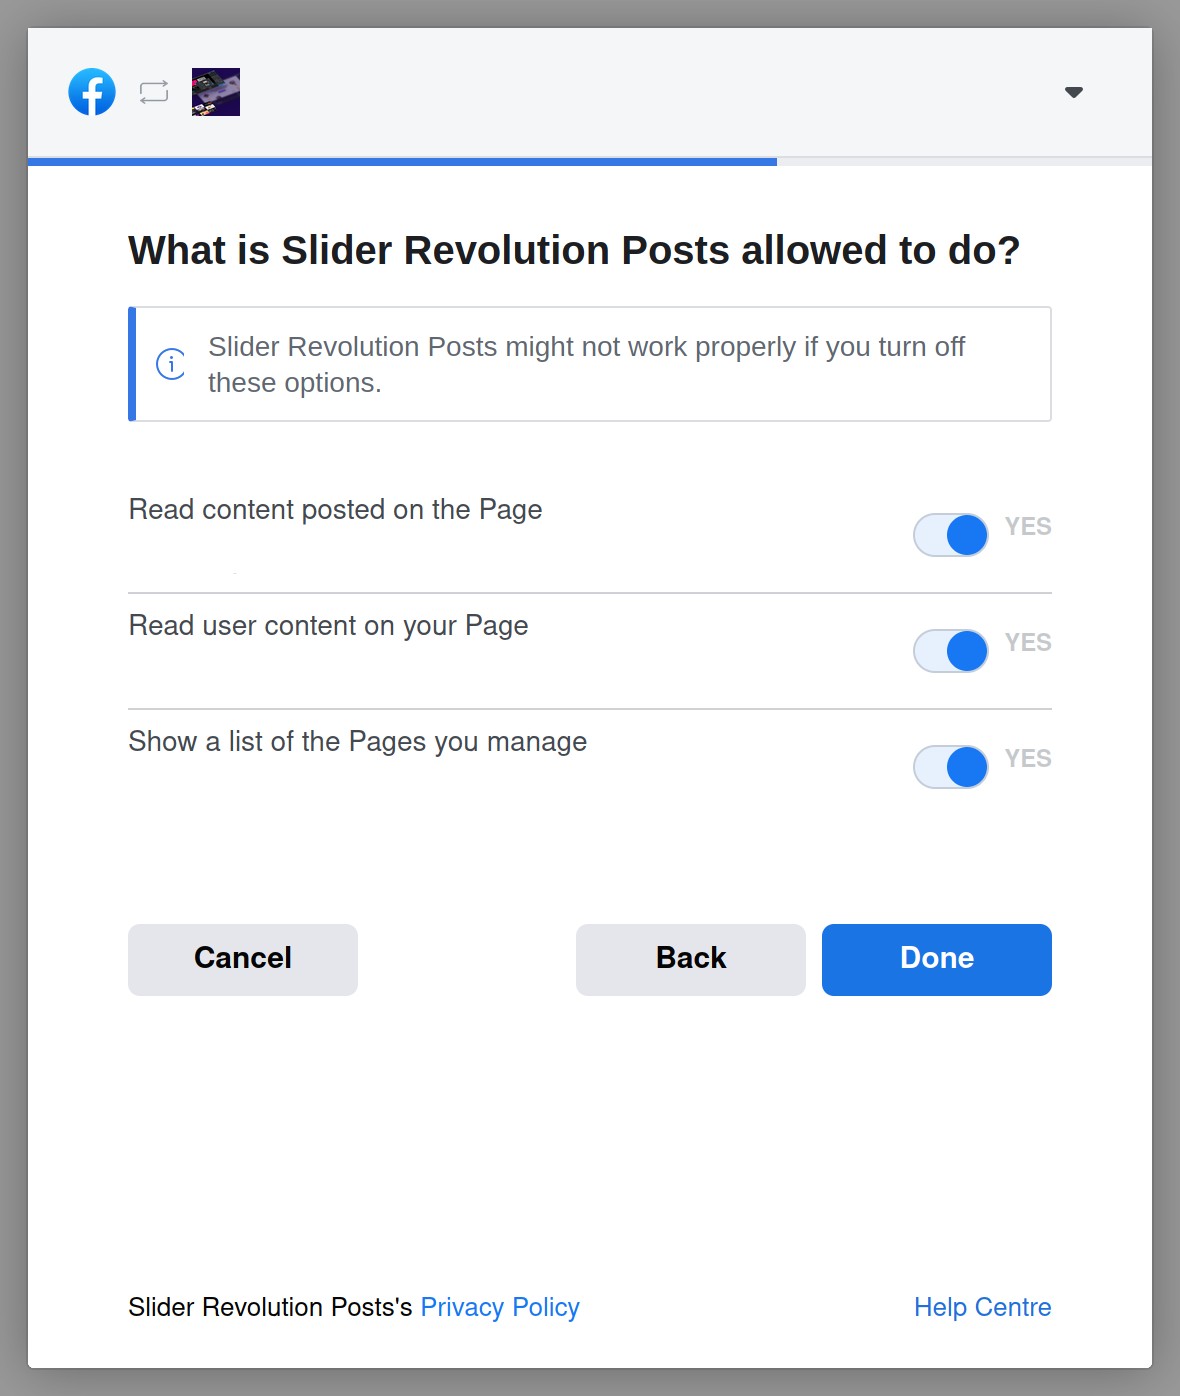
Set permissions for each way you’d like to allow the plugin to fetch content. In order to ensure your content can be properly fetched, each option should be set to YES:
On the final screen you’ll get confirmation of successful linking. Click OK to be redirected back to your site:
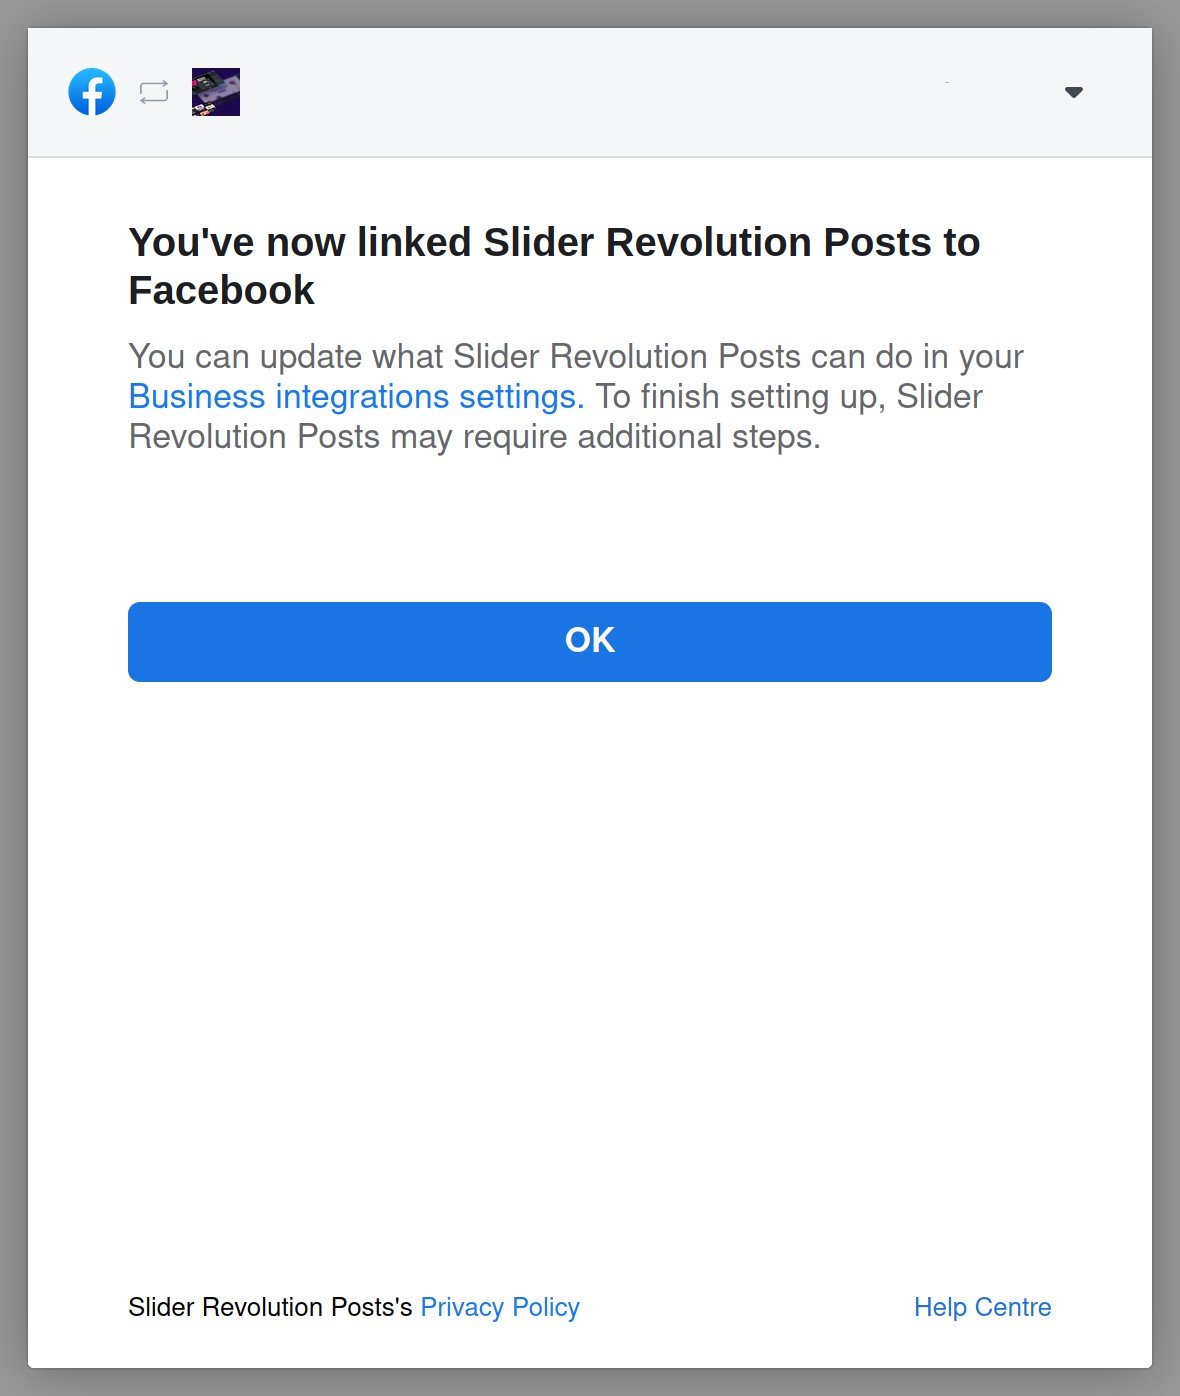
When you get back to your settings you’ll see the name of the Facebook page you selected displayed in the Connected To field:

Manual Token Source
To use a manually generated token, set the Token Source option to Manual:
The process for generating a Facebook User Access token manually is somewhat in depth, and beyond the scope of this guide, so we recommend you refer to Facebook’s official documentation on “Facebook Access Tokens“.
Album or Timeline
Once you’ve connected to a Facebook page you can set the Source option to Album to show a specific collection of content, or Timeline to show everything from your page:

Twitter is another service for which you’ll need API keys. Let’s see how to get everything setup.
Obtain and Add Twitter Keys
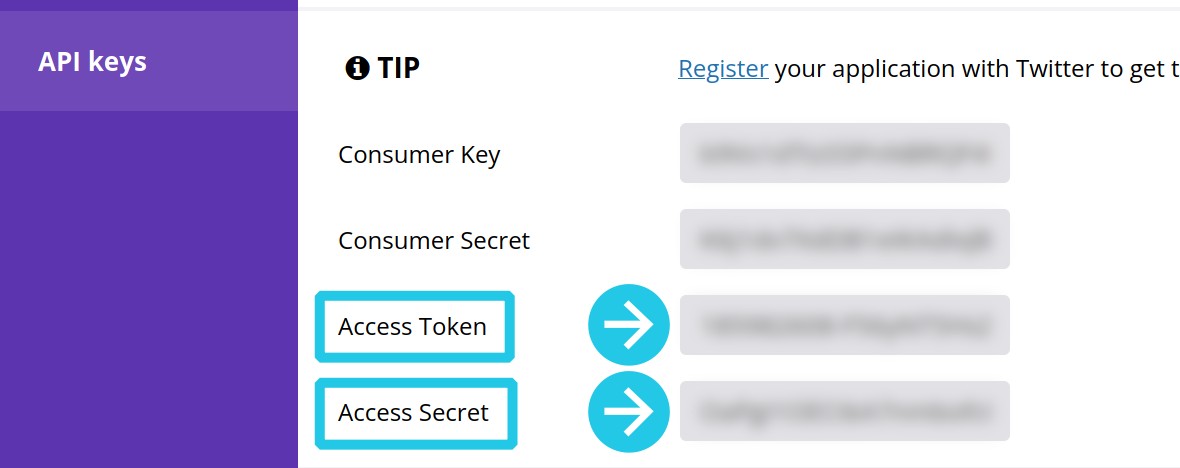
Twitter’s API requires you to use four different keys:
- Consumer API Key, also labeled as just API Key
- Consumer Secret Key, also labeled as just Secret Key
- Access Token
- Access Secret, also labeled as Access Token Secret
In order to get these keys you’ll need to register as a Twitter developer and go through an app setup process.
Register as a Twitter Developer
To register as a Twitter developer head to https://developer.twitter.com/
Click the Sign-up button, then follow the prompts to create your account:

You’ll be asked to fill in a couple of forms, confirm your email, then you’ll be able to go to the Twitter Developer dashboard.
Add an App
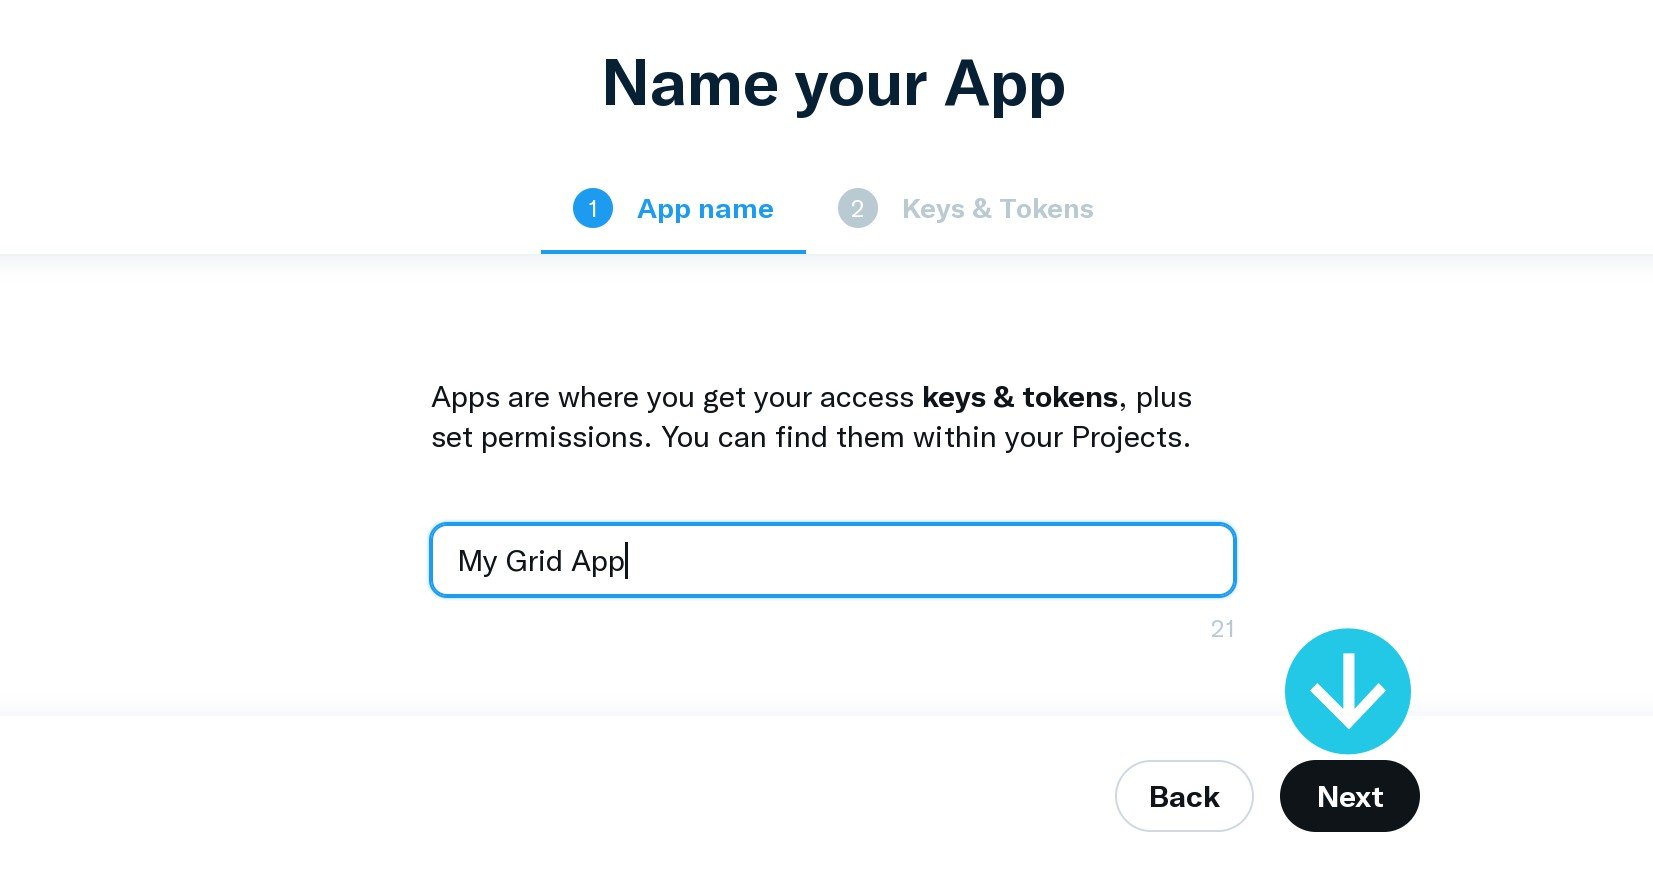
Once you arrive at the developer dashboard, create an app be clicking the +Add App button:

Give your app a name, then click the Next button to move into getting your keys:
Get Consumer API Keys
You’ll automatically be taken to a page displaying your API Key and API Key Secret. Even though there’s no inclusion of the word “consumer” anywhere here, these are the keys also referred to as Consumer Key and Consumer Secret, respectively:
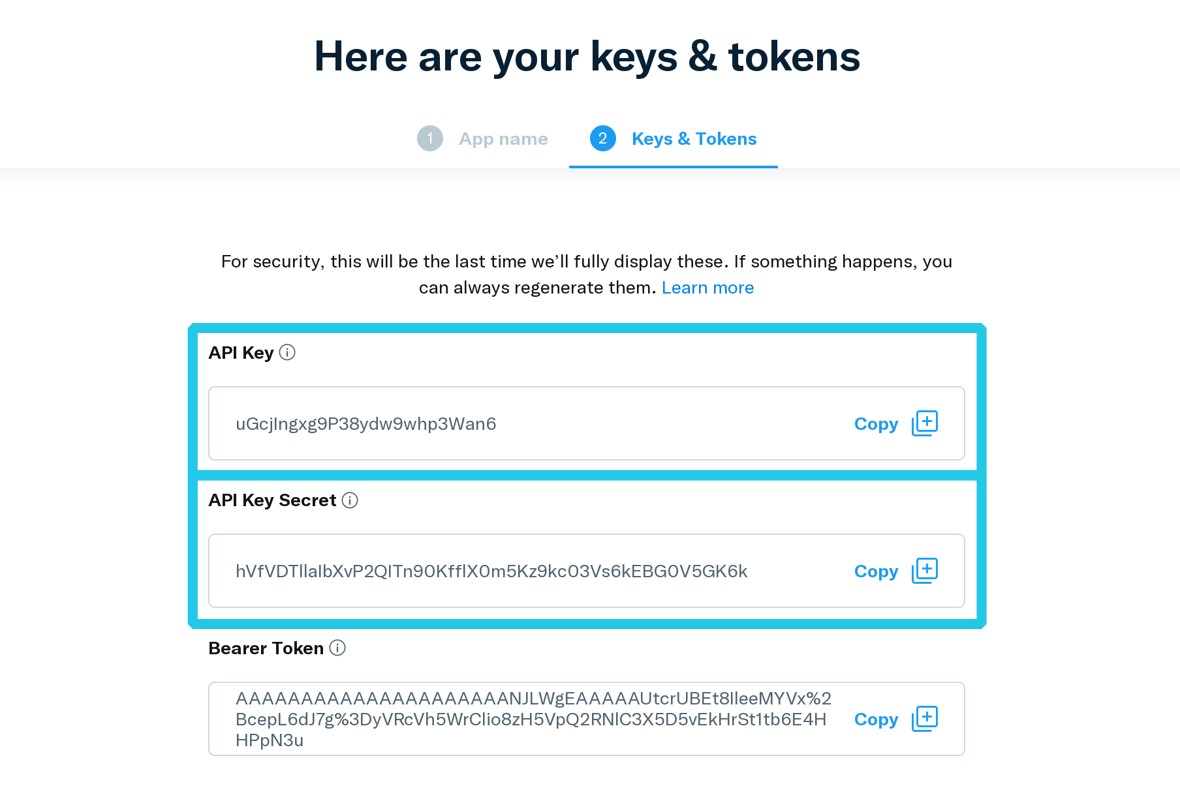
Copy the API Key and paste it into the Consumer Key field for your grid, then copy the API Key Secret and paste it into the Consumer Secret field for your grid:

Get Access Tokens
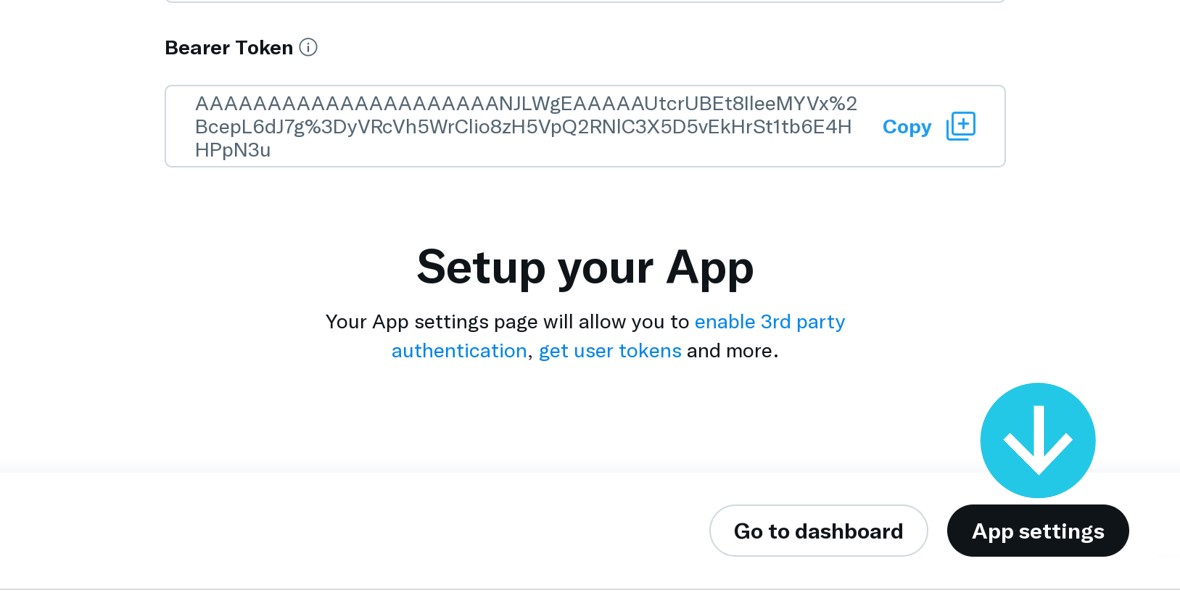
The page that gives to the first two keys doesn’t provide you with the other two keys you need as well, so there are a few more steps.
Click the App settings button to carry on:
Once on the app settings page, switch into the Keys and tokens tab:
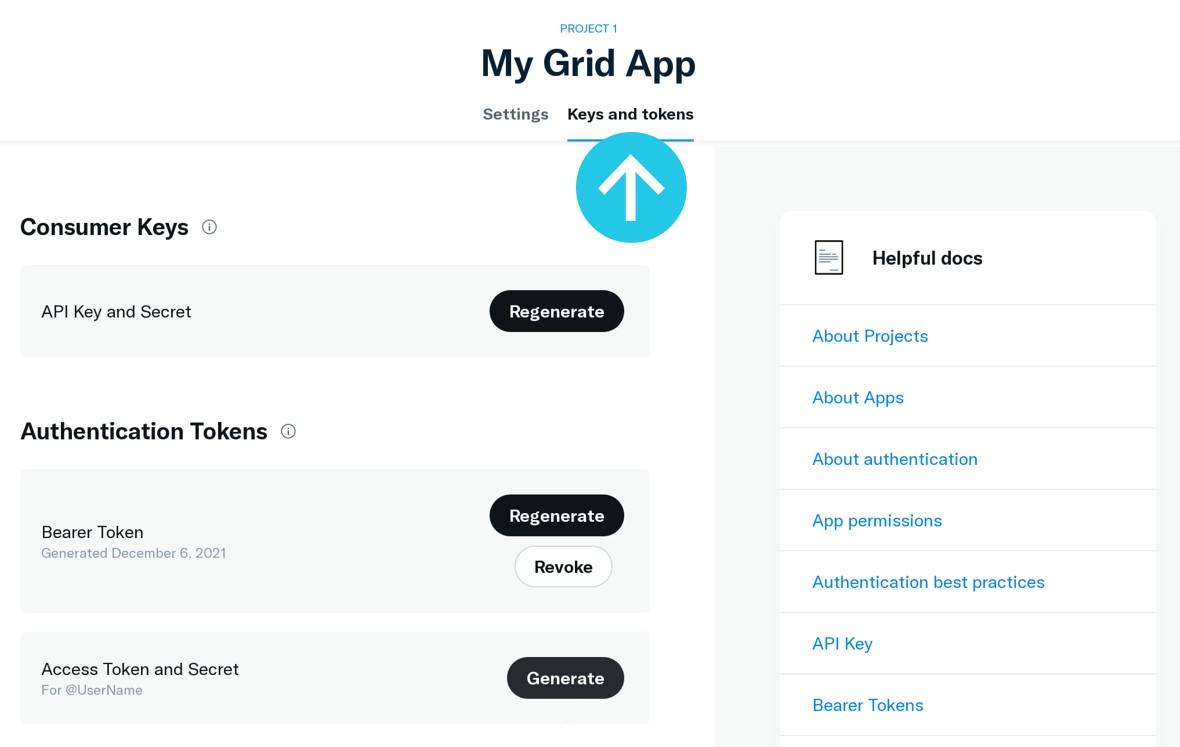
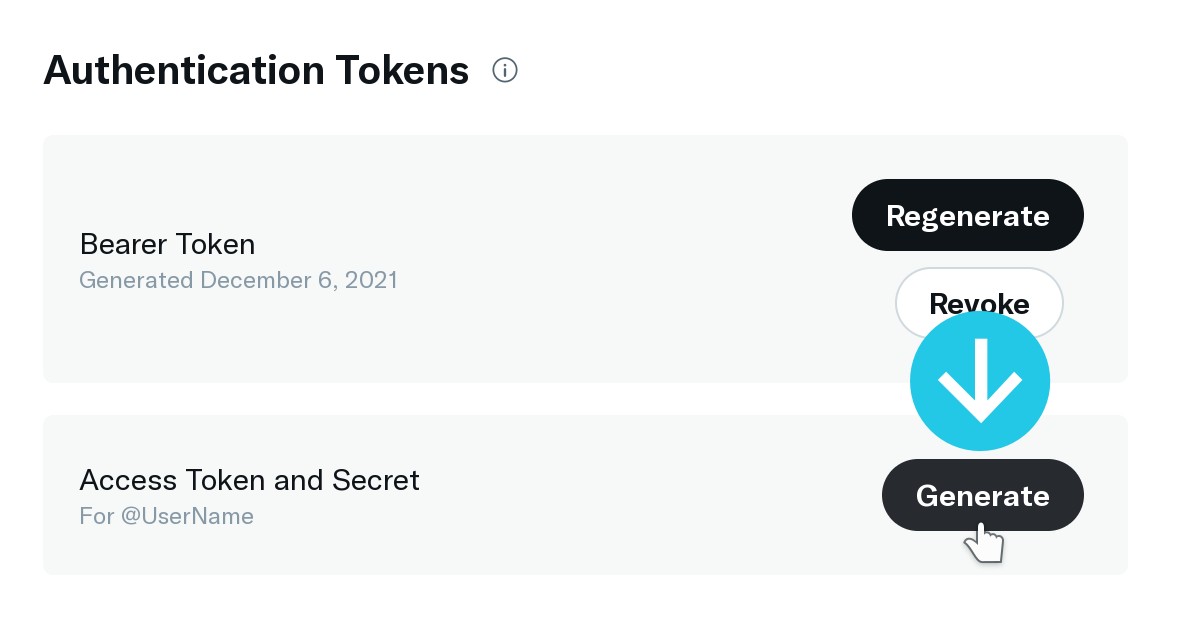
Towards the bottom of the page, in the Access Token and Secret section, click the Generate button:
A panel will appear displaying a collecting of keys. At the top are the API keys you already added to your grid, and at the bottom are the two access keys you still need:
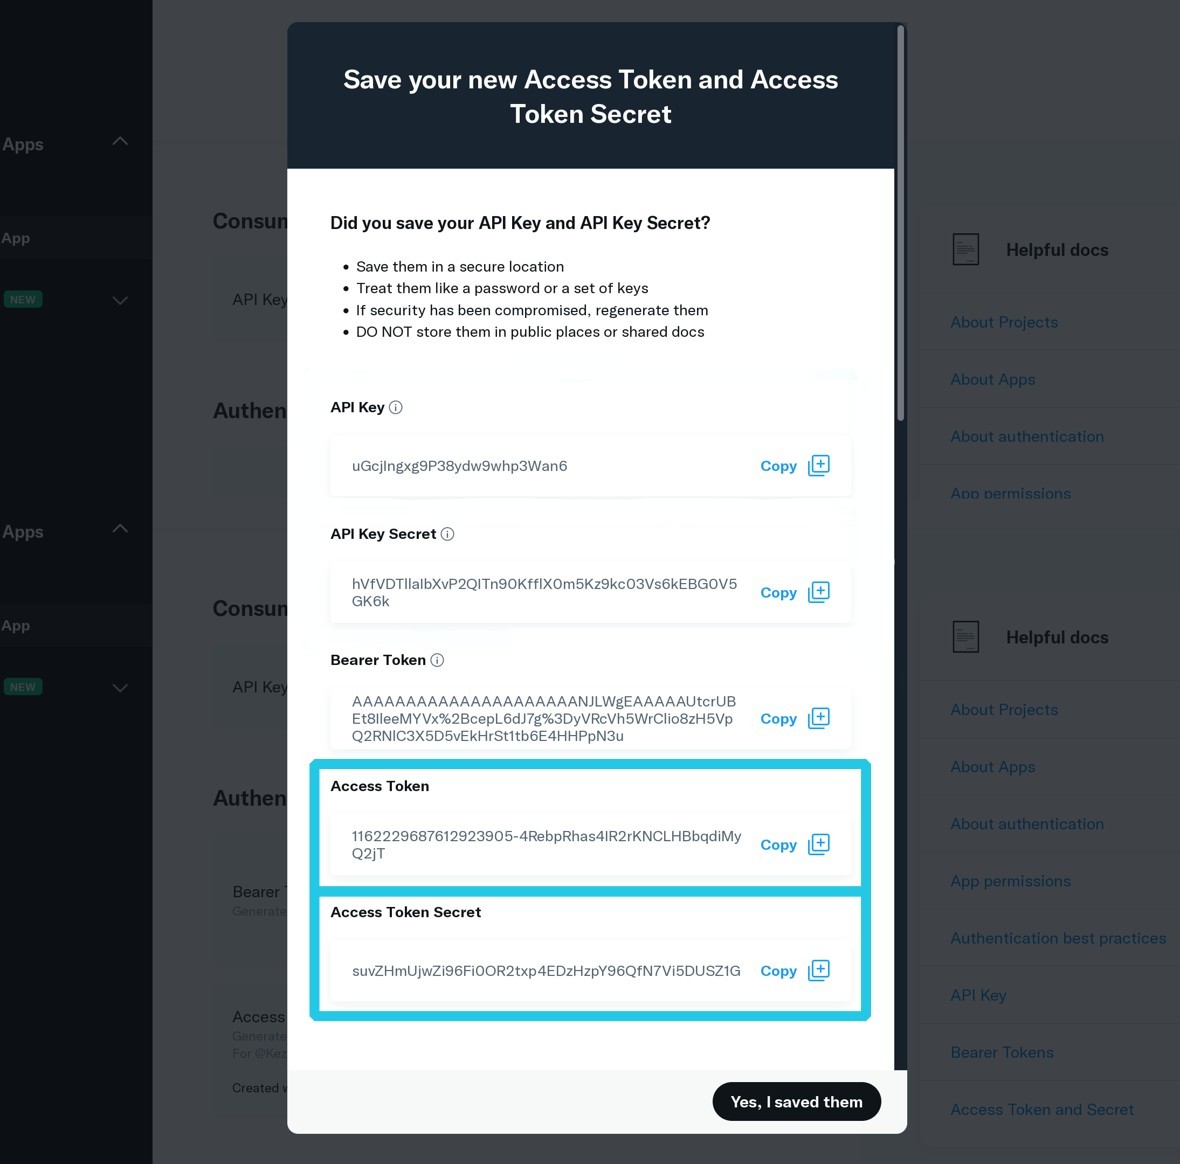
Copy the Access Token into the Access Token field for you grid, then copy the Access Token Secret into the Access Secret field for your grid:
Set Stream Options
Your grid should now be connected to the Twitter API, so the only remaining steps are to set your stream options.
Add the username of the Twitter account you want to show content from to the Twitter @ option:
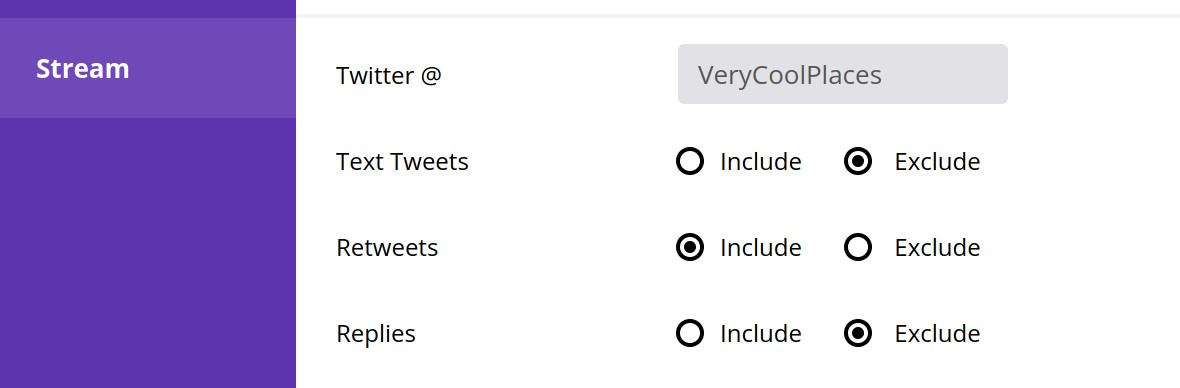
Use the Include/Exclude settings on the Text Tweets, Retweets and Replies options to determine what kind of Tweets show in your grid.
Behance
Behance requires an API key, however unfortunately they are no longer accepting any new API key registrations.
If you still have an API key you created previously you can use it with Essential Grid.
Additional Options
After connecting to the provider for your stream content, there are a couple of additional options you might want to adjust.
Image Sizes
If you are using YouTube, Vimeo, Flickr or Behance you’ll see a panel named Image Sizes.
Within that panel you’ll see an option named Grid Image Size. Use this setting to determine the size, and hence the quality, of the images that are fetched to be displayed in the grid:
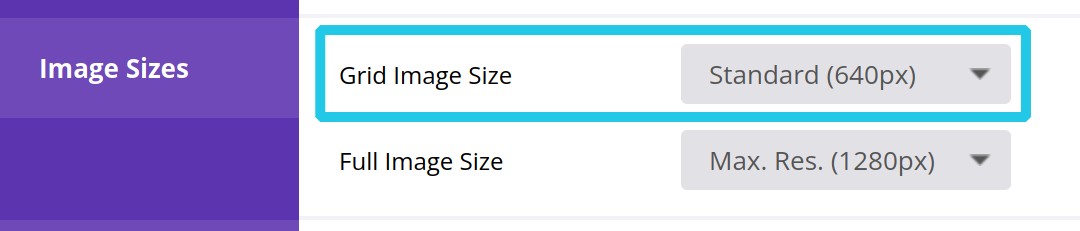
If using YouTube, Flickr or Behance an option named Full Image Size will appear. Use this option to determine the size and quality of images that will be shown in lightboxes when a visitor clicks a grid item:

Details
The last panel we are going to look at is the Details panel, containing the Count and Stream Cache options.
Use the Count option to set how many individual items you would like to have displayed in your grid:

And use the Stream Cache option to set the period of time, in seconds, that items should be stored in cache before being cleared:

Coming Up Next: Grid Settings
That wraps up our manual section on setting content sources for your grid.
You should now be comfortable working with internal content from your own site, streamed content from a third-party provider, as well as hand picked custom grid items.
In the next section of the manual will move on to how you can work with things like layout, media playback, pagination, and smart loading.
That’s all handled through the Grid Settings tab, so we’ll start with a quick overview of this tab in the next guide.
